About Front Range Woodturners
 We are the Denver area chapter of the AAW (American Association of Woodturners) serving woodturners throughout Colorado’s Front Range.
Our Meetings
We meet on the first Tuesday of every month from 6:15 PM to 9:00 PM in the basement of Rockler Woodworking and Hardware, 2553 S Colorado Blvd, Denver, 80222.
Visitors are welcome to join us at one of our meetings to see what we are all about.
Upcoming Demonstrations
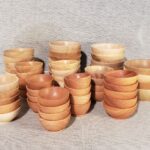
June – Pat Scott – Matched Set of Spice Bowls
Pat is primarily a utility turner who enjoys making pieces people will actually use in the kitchen. But utility doesn’t have to mean boring or plain — Pat’s wooden cookware is designed to blur the line between functional and art. He has been turning since 2005, having taken classes at Red Rocks Community College and then later with a handful of professional woodturners.
His specialty is bowls, plates, and peppermills, and he finds real satisfaction in seeing his work used daily rather than sitting on display. Pat understands what it takes to create pieces durable enough for everyday cooking yet refined enough to be passed down through the family.
Pat retired in 2015 and now turns full time. He started his own business after retiring and sells his work online and at craft shows. He served as President of the Front Range Woodturners from 2017 to 2019 and currently serves as Communications Chair and Webmaster.
Demo Description:
Spice Bowl, Salt Bowl, Pinch Bowl; whatever you call them, these small bowls are endlessly useful and fun to make. In this demo I’ll show how I turn a matching set: simple forms with clean lines, gentle curves, and a finish that feels good in the hand.
Spice bowls don’t take much time or material, and they work with almost any species and finish. They’re a great project for any skill level — a warm‑up for those returning to the lathe, a confidence builder for newer turners, and a satisfying design exercise for more experienced turners.
Creating a matching set is a good way to build muscle memory, refine your eye, and develop techniques that carry over to larger bowls. Even if repetition isn’t your thing, or if you’ve never made two pieces that truly match, you’ll pick up practical tips you can apply to whatever you enjoy turning.
July – Rick Orr – Turning a Perfect Sphere
 Rick is a past president of the Front Range Woodturners and this will be his tenth demonstration for the club, not including numerous Brown Bag sessions. He has also demonstrated for the Rocky Mountain Woodturners in Loveland, the Pueblo Woodturners, the Pikes Peak Woodturners in Colorado Springs, and the Yellowstone Woodturners in Billings, MT. Rick is a frequent demonstrator at the Rocky Mountain Woodturning Symposium, and his work was featured on the back cover of American Woodturner in February 2018, highlighting his bamboo fly rod tubes.
Demo Description:
Rick’s demo will cover using the Carter Perfect Sphere Tool to turn a rough blank into a sphere. The demo will include preparation of the blank into a cylinder mounted on a scroll chuck. The blank sphere pattern is then laid out to shape a turnable sphere. The set up of the Carter tool will be discussed in detail as well as the safety aspects of the entire operation. While this project normally requires a considerable amount of sanding, there will be no sanding done in the demo. Rick will also have several completed examples of his work from many different wood species on display and for discussion enjoy turning.
Demonstrators for 2026:
Aug – Michael Anderson – Spin Top on Coin Bearing
Sep – Steve Newberry (RMWT) – One Piece Teapots
Oct – J.Paul Fennel – Piercing
Nov – Patrick Crumpton – Sea Urchin Ornament w/Painted Interior
Dec – Holiday Party
Member Benefits
- Library – The Front Range Woodturners has an extensive collection of books, magazines, and videos available for members to check out at no cost.
- Demonstrations – Monthly meetings feature an exciting demo given by one of our club members or a professional turner. When available we also offer a full day hands-on class with these renowned turners at a nominal cost.
- Brown Bag Demo – Bring your lunch and watch a free in-person mini demo on a variety of topics in a smaller, more relaxed setting.
- HOW (Hands On Woodturning) – monthly hands-on-classes taught on a variety of subjects from Beginner to Advanced skill levels. HOW classes are free for members.
- Wood Drawing – Members can bring some of their excess (good) wood to a meeting so it can find a new home with a different member. You can never have too much wood!
- Group Buy – Do you want to save money? We have vendor discounts with Internet suppliers, local suppliers, tool and steel suppliers and wood suppliers. Through our deals with these vendors our members can easily earn back the cost of membership!
- Ladies of the Lathe – All female members of the FRW, aged 18 or older, are invited to join the Ladies of the Lathe. LOTL is intended to provide a comfortable, easy-paced, and non-threatening environment for women to learn and advance their skills in turning.
- Mentoring – Members have access to several programs to help increase their woodturning skills. Group sessions are held monthly and one-on-one mentoring on various topics can be arranged with experienced FRW volunteers.
- PHEOG – The Pete Holtus Educational Opportunity Grant program provides grant money to members through an application process. Applicants may request money for woodturning related classes, workshops, or symposium fees.
- Workshop Tours – monthly tour of members workshop. Get ideas and get inspired!
Special Notices
- The FORMS tab (above) has all of our forms in one spot (Group Buy, Membership, Gallery, etc).
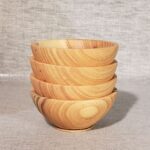
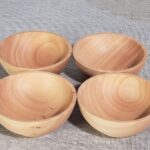
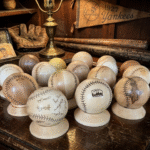
- The Turning Challenge for the July meeting is a Mini Bowl (which probably won’t win anything), so better yet is to make a Mini Bowl (Spice Bowl) Matching Set as expertly shown by The Amazing Pat Scott’s June demo.
- Our next Ladies of the Lathe class is June 2nd. Dennis Fanning will teach Yarn Bowls.
NOTE: Starting in July, LOTL is moving to the 4th Tuesday of the month instead of the 1st Tuesday. - Our June Brown Bag Demo (“view and chew” as Raleigh says) is on June 9th. Al Murphy will give a Brief Intro to Toolmaking. What kinds of steel can be used, what kind of tools can be made, heat treating, hardening, tempering, quenching – our own Forged In Fire demo!
- The next HOW class is on June 16th. The class is Turn a 3-Legged Stool. Turning a stool involves faceplate and spindle turning.
- Our next Group Buy is in July with pickup at the August meeting. Group Buys are once a quarter (Jan, Apr, Jul, Oct).
PHEOG Grant
2026 applications were extended until May 15th, and I’m happy to report we had four lucky recipients! Congratulations to all, and we look forward to seeing what you share with the club for your payback.Remember if you received an award last year you have 1 year to give your payback.
Upcoming Events
- Summer BBQ

 Mark your calendars for June 27th for our annual summer BBQ! It will be at the same place as last year, details and a SignUpGenius link will be sent to members.
American Association of Woodturners 40th International Woodturning Symposium
June 4 – 7, 2026
Raleigh Convention Center
Raleigh, NC Rocky Mountain Woodturning Symposium
What a great Symposium! Mark your calendars for next year:
September 18-20, 2026
Loveland, CO
rmwoodturningsymposium.com/